Stuffed Cabbage rolls

Jump to Recipe

First things first, for the people who are here for the recipe only…click on that ‘Jump to Recipe’ link above & enjoy. I see you 🙂 But at the same time, how nice and cozy does this sound?

It’s a chilly, gloomy fall day. You’re in your comfy clothes, watching a movie on the couch and sipping a hot cup of apple cider slightly spiced with a cinnamon stick. And there’s no need to light that pumpkin candle on your coffee table just yet, because right now you have the best aroma filling your home from the stuffed cabbage rolls baking in the oven for dinner. The scene can be modified of course…maybe you’re actually reading a book or the newspaper. Or possibly coding or blogging on your laptop 🙂 And maybe the apple cider isn’t cutting it that day and you’re enjoying a latte or hot toddy instead. Two things are certain though…the smell of that tomato juice cooking with the cabbage rolls is amazing and pairing the stuffed cabbage rolls with smashed potatoes makes the coziest fall meal.

These are also perfect for meal prepping, because they freeze exceptionally well. I know this because my grandma is known for spoiling her grandchildren with random deliveries of frozen lasagne rolls or cabbage rolls. You can even bake them without thawing first so it can make weeknight dinners really easy if you just have the time to bake! To add to the spoiling, we pour home-canned tomato juice over our cabbage rolls and that just really takes this meal from good to great. So let’s get to the details…

Quick glance at the ingredient list to start with step by step instructions to follow…

Cabbage – which you can still find locally grown at the farmer’s market for a short while even if you live in a state where it’s getting colder since this vegetable tolerates those cooler temperatures well! You can also use bell peppers with this recipe to make stuffed peppers instead of stuffed cabbage rolls.

Ground Beef – We always look for lean, organic and grass-fed. Remember too that with this recipe you won’t be draining the grease after cooking the ground beef so that’s another reason to go with a lean version here.

Tomato Sauce – The recipe calls for one (14 or 15 oz) can and to be honest it’s a bit more than you need, but if you don’t use quite the whole can and have a couple tablespoons of tomato sauce leftover I have no idea what you’re going to do with it! So just go with it, it adds such good flavor and your meat filling will not be dry!!

Quick Cook Rice – You can use whatever rice you like best here. We always use brown rice or a brown rice and quinoa mix. I usually buy the ‘Seeds of Change’ brand.

Onion – Have you ever looked up ‘onion jokes’ because you didn’t know what to say about onions in an ingredient list? You can truly find anything on Google. Except a really good onion joke. Maybe my standards are too high haha

Worcestershire Sauce – Can anyone says this properly five times fast? One time? Regardless, this is another ingredient that adds such good flavor! I tend to do a generous portion of whatever amount the recipe lists!

Eggs – For binding everything together in your meat mixture, of course. Our favorite ones are still vital farms if we don’t have any fresh eggs from my brother-in-law 😉

Salt & Pepper – As almost always 🙂

Potatoes – Highly recommend adding potatoes to complete the meal. We just cube them and throw them in the roasting pan with the cabbage rolls and then smash them like a baked potato when plating, top with a little butter, freshly cracked pepper and a drizzle of tomato juice….y.u.m.

Tomato Juice – Speaking of 🙂 The icing on the cake in this scenario since ours is home canned by Grandma. I don’t have a great store recommendation, but I can tell you that canning tomato juice is a bit easier than you might think. Check out my ‘How to Can Tomato Juice’ post if you’re interested!

Step One:

Peel large leaves off a head of cabbage that can be used to roll up with the stuffing inside. Rinse well and blanch in boiling water to make rolling them up easier. Meaning they just need to be in the boiling water for a couple minutes to make the leaves more flexible, but not really cook the cabbage. Set aside while you make the meat mixture.

Step Two:

In a large bowl, mix together the ground beef, tomato sauce, rice, onion, Worcestershire sauce, beaten eggs, salt and pepper. Once well mixed, spoon the meat mixture onto each cabbage leaf. I wear disposable cooking gloves for this part and form each one into a mini meatloaf kind of shape to make them easy to rollup, if that makes sense! Next, roll up each meat filled cabbage leaf and add to a roasting pan. You can use toothpicks to keep the cabbage roll together if needed.

Step Three:

At this point, I like to peel a couple potatoes and dice them up to add to the cabbage rolls in the roasting pan. They really help to complete the meal. Plus, do you love one pan dinners? Me too.

Step Four:

Saving the best for last. Pour that tomato juice over the cabbage rolls and potatoes in the roasting pan, cover with the lid and place it in the oven to bake for an hour or so. I love meals that bake in the oven or cook in the crockpot, because then I can get other things done while dinner is being made and I feel so much more productive. Last time I made these I cleaned up the kitchen and worked out while they were cooking. And then I was rewarded with a delicious dinner. The little things haha

Full recipe details below. Stay cozy and enjoy, y’all 🙂

Stuffed Cabbage Rolls

Prep Time 20 minutes
Cook Time 1 hour 15 minutes
Servings 4

Ingredients

  • 1 head green cabbage
  • 1 lb lean ground beef
  • 1 15 oz can tomato sauce
  • 1/2 cup quick cook rice uncooked
  • 2 Tbsp chopped onions
  • 1 tsp Worcestershire sauce
  • 1 tsp salt
  • 1/2 tsp pepper
  • 2 eggs beaten
  • 2 – 3 large potatoes peeled and cubed
  • 1 quart tomato juice

Instructions

  1. Preheat the oven to 350 degrees Fahrenheit.

  2. Peel off enough cabbage leaves from the head of cabbage to make five or six cabbage rolls. Blanch the cabbage leaves in boiling water for two to three minutes. Remove from the water, pat dry and set aside.

  3. In a large bowl, mix together the beef, tomato sauce, rice, onion, Worcestershire sauce, salt, pepper and eggs. Once combined, add spoonfuls to each cabbage roll. Roll up each one and insert a toothpick as needed to help the cabbage roll stay together.

  4. Place the cabbage rolls in a large roasting pan. Peel and cut russet potatoes, if using, and add the cubed potatoes to the roasting pan on and around the cabbage rolls.

  5. Pour tomato juice over the cabbage rolls and potatoes. Add the lid to the roasting pan and place in the oven. Bake for one hour. Be sure meat is fully cooked and cabbage is soft enough to be easily cut with a fork. Enjoy!

Have a beautiful day!


Dad’s Homemade Buffalo Wing Sauce

Jump to Recipe

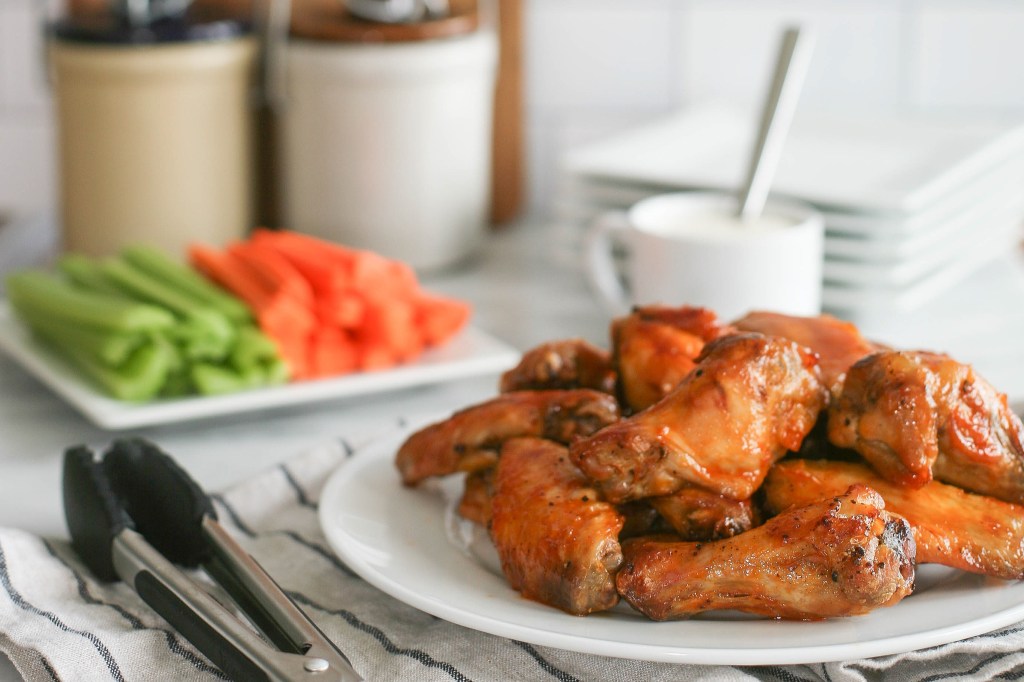
Did you grow up with a traditional pizza night every week? What about a wing night? Or maybe you combined the two. Brilliant.

I definitely grew up on one favorite pizza shop (Penso’s, family owned in my home town and still our favorite to this day), but we hopped around when it came to visiting restaurants for wing night. And for some reason I remember that often being Thursdays. But while we found plenty of great spots to grab wings at a good price over the years, I’ll likely choose these baked wings tossed in homemade sauce any day….that I feel like cooking 🙂 And honestly, you don’t even have to feel that motivated to make these; the effort is minimal and the sauce takes a true five minutes to make on the stove.

You’ll want to get the wings going first and make the sauce while the chicken is broiling. If you can find split wings at the grocery store, that’ll make your life easier from the start. If you can only find whole wings, you can also split them at home using a sharp knife…which I rarely attempt and in those cases just bake them as is letting down real chefs in kitchens all around the world haha

Pat the chicken wings dry as needed and place them on a foil covered baking pan. Sprinkle with black pepper, place in oven and broil on high for fifteen minutes. At fifteen minutes, turn the broiler off, flip the wings and then broil for another fifteen minutes. If a good bit of grease is already laying on the foil, feel free to move the wings to a new foil covered pan as you flip and before you broil them a second time.

While the wings are broiling, add all six sauce ingredients to a small saucepan over medium heat and stir together as the butter melts and everything mixes together. Reduce heat and allow the sauce to cook down slightly so it gets a little thicker. That’s literally it. The recipe calls for half a stick of butter (four tablespoons). I tend to keep with this amount, but you can go up to five tablespoons if you’d like (Dad does) and that helps with the sauce sticking to the wings a bit better. Set aside a small cup of sauce to use for later; you’ll toss the wings directly in the saucepan.

Back to the oven…turn the broiler off and remove the wings from the oven. Preheat the oven to 350 degrees. Use tongs to blot each wing on a paper towel, toss in sauce and place on a new foil covered baking pan. Once all wings have been tossed in sauce and transferred to the new baking pan, place back in oven and bake for 15 minutes or until fully cooked. Remove from oven and brush on extra sauce as desired using the sauce you reserved in a small cup earlier.

That’s all it takes for the wings! We typically like to serve them with pretty traditional sides…fries (we love the rosemary with sea salt fries by Alexa) and of course we serve carrots and celery with ranch or blue cheese dressing. Here’s the great part though. This sauce works perfectly well with shredded chicken and I suspect just as well with cauliflower too in case wings are just not your thing. I haven’t tried it with cauliflower yet, but the shredded chicken is super simple. Just slow cook chicken breasts or chicken thighs in the crockpot or oven in a little bit of broth. When the chicken is done, remove it from the crockpot or roasting pan and discard the broth & juices. Shred the chicken, add back to the crockpot or roasting pan, pour sauce over top and toss to mix. Let that sit for a little bit to marinade and then serve as sandwiches, wraps or in salads. I go for the salad option more often than not. so good!

Check out the full recipe below and let me know how you choose to use the sauce! And if you photograph your delicious creation and share on Instagram, tag me! I’d love to see! @pinch.of.parsley 🙂

Print Recipe

Dad’s Homemade Wing Sauce

The perfect sauce to toss your wings, shredded chicken or cauliflower in for dinner!

Prep Time 5 minutes
Cook Time 5 minutes

Ingredients

  • 4 – 5 Tbsp butter* sliced
  • 1/2 cup Frank's Original Hot Sauce
  • 1 Tbsp apple cider vinegar
  • 1 Tbsp Worcestershire Sauce
  • 1 Tbsp Lemon Juice freshly squeezed
  • 2 Tbsp Honey

Instructions

  1. Add all ingredients to a small saucepan over medium heat. Stir frequently as butter melts and all ingredients mix together.

  2. Reduce heat and allow the sauce to cook down slightly so it gets thicker.

  3. Remove from heat. If not quite ready to use, be sure to stir again before tossing wings or cauliflower or before pouring over shredded meat. Enjoy!

Recipe Notes

*You can use 4 or 5 tablespoons of butter depending on preference. As noted within the post, using 5 tablespoons will help the sauce stick to wings a bit better!

Have a beautiful day!


Lemon Meringue Pie

With no family get together at Easter this year, because of the stay at home order, I wasn’t spoiled with my typical lemon meringue pie made by Grandma. So, I ventured out and made my own and I’m happy to report it went quite well! I may have done a take two with the meringue, but who would even know looking at those photos 🙂 Don’t worry, baking the meringue is a perfectly good option over Read More


Blueberry Lemon Crumble Bars

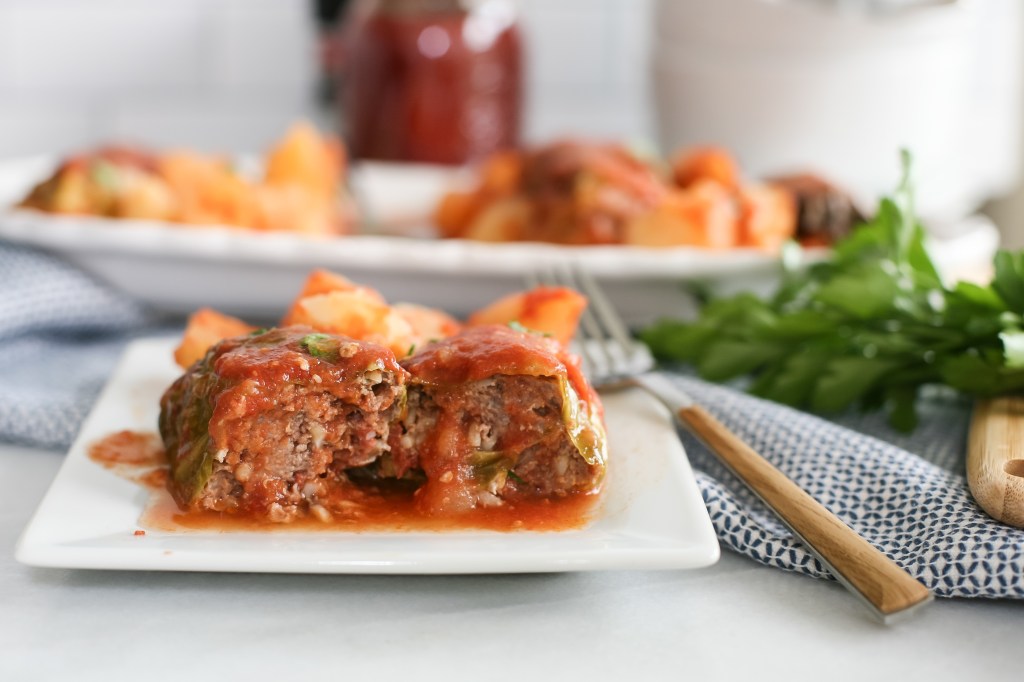
I saw a meme today that said ‘Congratulations, you’ve made it to April. Welcome to level 4 of Jumanji!’ And isn’t that just life right now? The funny memes are a necessity to stay grounded, lighthearted and laugh a little; I for one am very appreciative of the people creating and sharing these! And then I was thinking, what can I put out there that also helps in just a small way and that’s why this post titled ‘Blueberry Lemon Crumble Bars’ is also going to be full of ideas on how to pass enjoy your time during the stay at home order your community may be following at the moment. But let’s not completely skip over these crumble bars, because making them is definitely included in the list 🙂

IMG_8976-2

A few important call-outs when it comes to this breakfast, snack or dessert (you decide)! If you have Jeni’s ice cream in your freezer, the brambleberry crisp flavor, it goes so perfectly with these crumble bars. If you’ve never had any of Jeni’s ice cream, please click this link and treat yourself. I’ll wait… Did you go with the classics? Her honey vanilla bean ice cream is my absolute favorite vanilla ice cream and the darkest chocolate just makes me feel less guilty about taking an extra scoop. hello. antioxidants 🙂 Or maybe you ventured out a bit…I also love the wildberry lavender and the roasted sweet corn and black raspberry, the latter of which they only offer seasonally….sometimes! We live in an unfair world, friends!

Second call-out is about the crumble crust and topping. This is actually the same recipe used in the Strawberry Rhubarb crumble bars I shared last spring! It’s just as delicious here, but the blueberry filling is more saucy/runny and the crumble doesn’t hold up as well in the fridge (gets a bit soggy) making the leftovers deliciously messy. Good news though. If you’re making these for a dinner party or small get together with friends or family, you likely won’t have leftovers 🙂

So about that fussy crumble. Start by adding the oats, pecans or walnuts, almond flour, brown sugar, ground flaxseed, cinnamon and salt to a food processor to blend all together. I used almond flour from Trader Joes again this time, but have also used ‘Bob’s Red Mill’ brand and both worked well!

Then add the coconut oil and water and blend once more until everything is mixed and sticks together well. Press 2/3 of the crumble into an 8×8 baking dish to create the crust layer. As always, I lined my baking dish with parchment paper, because it makes clean up so darn easy! Bake for 20 to 25 minutes. (I did 20 in my oven, others may vary)

Meanwhile, you can make the filling on the stove. You’ll mix fresh blueberries with brown sugar, fresh squeezed lemon juice and corn starch over low to medium heat. Just keep stirring occasionally until it looks like the photo on the right and then remove from heat and let it cool while the crust is baking and also cooling for a few minutes.

Lastly, you’ll pour the blueberry filling over the crust (I didn’t use all of it and did try to leave some of the liquid in the pan so it wasn’t too much for the bars. Pro tip – use the leftover in place of syrup over pancakes or waffles!) and then sprinkle the remaining crumble over the blueberry filling. Bake for another 20 minutes or until the topping is crisp and browned. Remove from oven and let cool almost completely before cutting and enjoying! I am really wishing I had enough blueberries to make this right now after writing about it and staring at the photos!! But trips to the store are limited these days as we’re trying to stay home as much as possible. And on that note, let me share a few ideas for how to enjoy the time at home. I’ve found it can be quite productive and it’s really not that bad of a situation at all depending how you look at it.

IMG_8985-2

Activity Recommendations 

  • Workout! – This is seriously the perfect time to finally get a routine going in the exercise department and an even better time to release all the endorphins! Peloton has a 90 day free trial of their app going on right now and it’s amazing! I’m loving the strength workouts. The instructors are really motivating as is the tracking and setup of your profile and they are super positive! Highly recommend! And if you keep the app after the trial, it’s just $12.99/month! I’ve also heard several people talk about how much they are enjoying Yoga with Adrienne on Youtube!
  • Bike Riding – Do you have an old bike in your basement or garage collecting dust and a nice bike path nearby? Bike paths seem to be everywhere these days and if a pandemic had to happen at some point during the year at least it’s during the springtime when the weather is turning nice and nature is coming back to life and blooming! Bike rides can truly be relaxing, no need to make it an intense workout.
  • Gardening – one of our local garden centers is taking online orders that you can pick up curbside or have delivered. Perfect time to work on some flower beds and bonus for doing this on a sunny day and getting some Vitamin D
  • Cooking & Baking – How could I not suggest this? 🙂 some of my favorite recipes on my blog are potato soup, broccoli cheddar soup, superfoods soup, egg salad, banana bread, Dad’s chocolate chip cookies, the homemade honey mustard dressing and paired salad, taco stuffed peppers and creamy pasta salad!
  • Reading – I have majorly slacked in this category lately but such a great way to start or end the day with a cup of coffee or hot tea! Books I’ve loved…Yes, Please by Amy Poehler, The Dollhouse by Fiona Davis, A Magnolia Story, The Hunger Games and Harry Potter series, The Nightingale by Kristin Hannah and Rhett and Link’s Book of Mythicality (this one is great for kids and just a fun read overall!)
  • Board Games – When Hailey was younger especially, we did game nights pretty often but had a few favorites we always went back to…Monopoly Empire (so much quicker than traditional Monopoly), Clue and Life. Classics! If you’re looking for something to play solo on your phone that’s also good for your brain I really like the Wordscapes and Lumosity apps!
  • The things stuck on your to do list – cleaning out and organizing the basement, garage, that one closet or the junk drawer in your kitchen. Starting a blog! Putting your idea for a side business into motion. DIY projects. Learning how to paint, play piano…anything you can watch a video for on youtube really. Digitizing photo prints, making an album online.
  • Your Turn – What else? What are you doing with your extra time at home?

And in all this, for sure take advantage of the technology we have and make video calls to friends and family to stay connected, see everyone’s face and hear their voices! It really makes a difference! Oh! and if you’re on Instagram follow two accounts in particular…@tankgoodnews and @goodnews_movement. There is so much good going on in the world right now and it’s refreshing to read about that every day! I like to watch our governor’s daily press conferences, but I try not to over consume news outside of that which I also find helpful!

If you stuck with me until now, thank you!! haha Let me reward you with the full recipe for these bars and if you only make the filling and just eat it with a spoon I wouldn’t judge you at all! 😉

Stay safe & healthy, friends!!

Blueberry Lemon Crumble Bars

Prep Time 15 minutes
Cook Time 45 minutes
Servings 8

Ingredients

  • 2/3 cup whole rolled oats & additional for garnish
  • 2/3 cup chopped walnuts or pecans
  • 1/2 cup almond flour
  • 1/2 cup light brown sugar
  • 1/4 cup ground flaxseed
  • 1 tsp cinnamon
  • 1/4 tsp sea salt
  • 2 Tbsp firm coconut oil
  • 1 1/2 Tbsp filtered water
  • 1 pound fresh blueberries
  • 1/4 cup light brown sugar
  • 1/8 - 1/4 cup fresh squeezed lemon juice I use 1/4 cup since I like the tartness
  • 1 1/2 Tbsp cornstarch

Instructions

  1. Preheat the oven to 350 degrees F and line an 8x8 baking dish with parchment paper.

  2. Make the crumble by mixing the oats, walnuts or pecans, almond flour, brown sugar, flaxseed, cinnamon and salt in a food processor. Once combined, add the coconut oil and pulse again. Then add the water and pulse one more time until everything is mixed well.

  3. Press 2/3 of the crumble into the baking dish to create the crust layer. Bake for 20-25 minutes and then remove from the oven and allow to cool for 10 - 15 minutes.

  4. While the crust is baking, mix up your filling. Add the blueberries, brown sugar, lemon juice and cornstarch to a sauce pan over low to medium heat and stir occasionally until berries burst and the ingredients turn into a sauce type filling. Remove from heat and allow to thicken slightly.

  5. Pour the blueberry filling over the slightly cooled crust and sprinkle with remaining crumble or as much of the crumble as your prefer. Garnish with a few more oats and return to the oven to bake another 20 minutes, until the crumble topping is crisp.

  6. Let cool completely before slicing into bars and serve immediately or store cooled bars in a tupperware container in the fridge. Enjoy with ice cream or on their own!

Have a beautiful day!!


Crab Stuffed Mushrooms

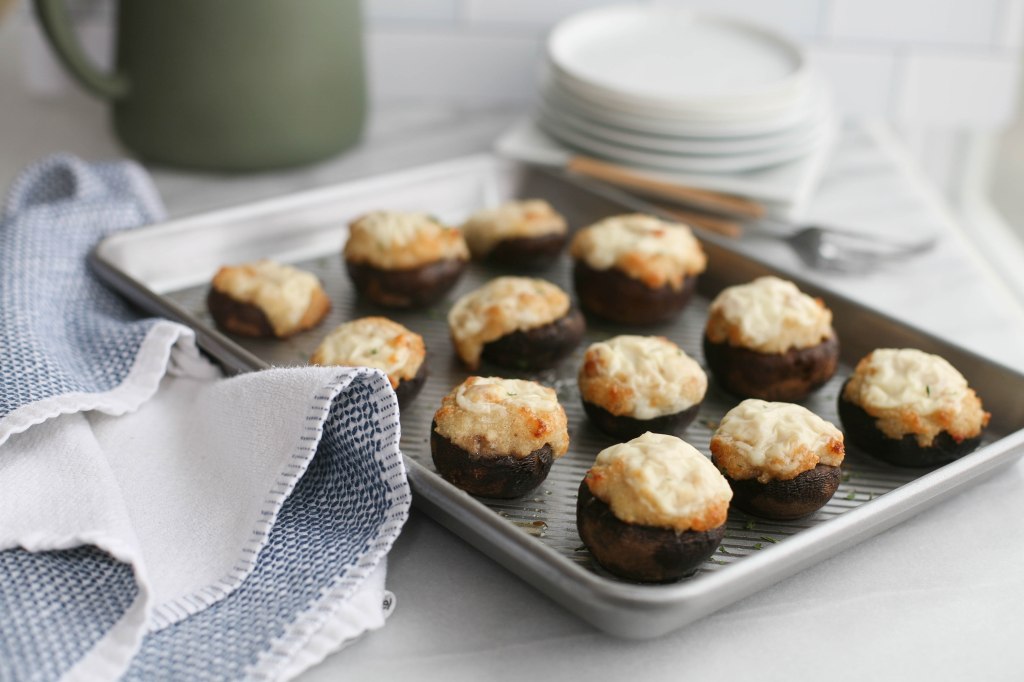
Back in the day, when it was relatively easy for everyone to get together at Grandma’s on Christmas Eve, you could show up expecting crab stuffed mushrooms, salad, lasagne and plain chicken wings for dinner and never be let down. It was our Christmas Eve tradition. Dad made the stuffed mushrooms for our appetizer and Grandma made the rest. But my brother and I live a couple hours away now and Read More


Chicken, Avocado & Pear Salad with Homemade Honey Mustard Dressing

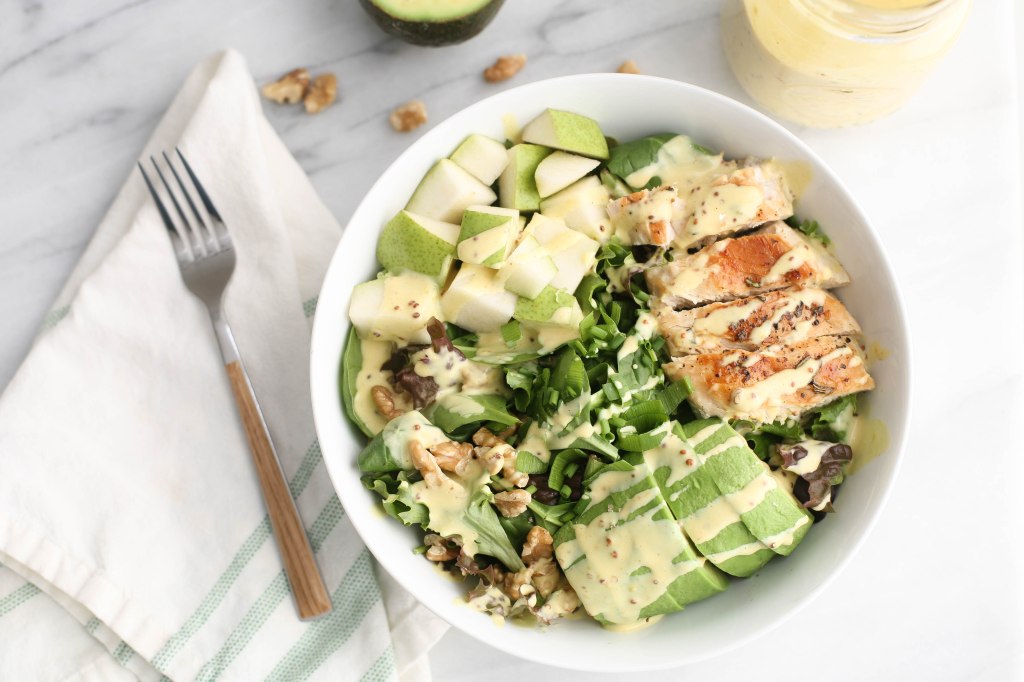
The title of this post is a little long. I could have just titled it Homemade Honey Mustard Dressing, because that’s really the star of the show here. But then there’s this salad that turned out to be the perfect combination of ingredients to pair with the dressing and I couldn’t just choose one or two ingredients to highlight. At the same time, I didn’t want to get completely carried away…Chicken, Avocado, Pear, Walnut and Read More


Roasted Sweet Potatoes

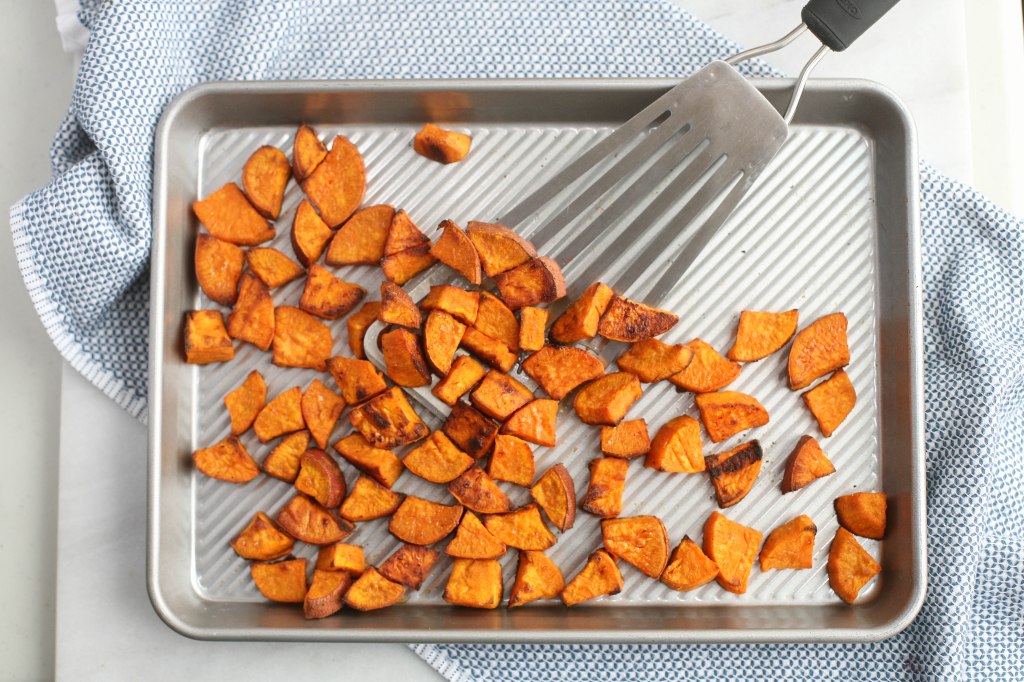
This will likely be the easiest recipe I ever post here and it should really be a staple in your household for that reason alone. Plus, the roasted potatoes are just so tasty! That’s from the caramelization magic that takes place during the roasting process. So good. Aside from using these potatoes as a perfect side dish to countless meals, I’ve recently discovered Read More


Healthier Green Bean Casserole

Don’t get me wrong, I love the classic green bean casserole! But sometimes it feels good to swap the processed cream of mushroom soup and french fried onions with a homemade mushroom Alfredo sauce and panko crusted red onions. And what better time to jump on the healthy bandwagon than the last day of the year? The first day of the new year. That’s the answer isn’t it? 😉 Good thing, because this casserole would be a perfect side dish to compliment the traditional roast pork and sauerkraut on new years day.

IMG_8877-2

Speaking of the new year, are you a resolution maker? I was just talking about this on Instagram yesterday telling y’all I like to make goals and reflect on the past year and what I want the new year to bring, but I stay away from resolutions. I don’t need that kind of pressure or the disappointment of missing the gym for a week in February when real life sets in again. I’m kidding, you won’t find me at the gym at all this year. I like my workouts when I feel like it and in the comfort of my home haha

I also know some people who choose a word for the year and do their best to live by that word and embrace the true definition of it. In 2019, a friend from high school chose the word, or phrase rather, Cura di te. It’s Italian and means to take care of yourself because you care about yourself. It was focused on putting herself first when it was needed and warranted rather than focusing on everyone and everything else instead. I love this! What a great way to look back at your day or week, especially if you’re not in the best of moods, and be able to ask yourself what you’re focusing on and if it’s in line with your word that you chose for a specific reason. Do you or anyone you know do this? Here’s my biggest challenge with the idea…I’m SO indecisive. It might be June before I decide on word 🙂

But one thing I am focusing on in 2020 is sticking to a routine. I love the idea of healthy habits and do several, but really none of them on a regular basis so I don’t get the full benefit of these things. Some days I do well with drinking plenty of water and eating enough calories (yes, some of do struggle with this) and other days I just don’t make time for it. Some days I work out and other months I don’t. Same with applying face masks. And how about those some days when I remember the little things aren’t worth stressing over and go my happy way and other weeks when I let those things get the best of me. Those moments will always be around and I’m totally okay with it. But maybe this year I can actually start every day with a glass of water. And when I’m on top of it, that glass of water will have a cute little lemon slice and a splash of apple cider vinegar! Know what I mean? I’ll definitely keep going to ballet class on Thursday evenings, because that is one thing I actually did stick to religiously since class started this past September! Go me 🙂 Am I rambling yet? Sometimes you have to cut me off and I’m good with that. What’s your focus for 2020? Or your favorite routines that you have in place now or want to start in the new year? I’d love to hear about them in the comments below! While you think about it…let’s get back to this green bean casserole with a little step by step action to show you how to make this simple dish!

00100lrPORTRAIT_00100_BURST20191215093854627_COVER

Look at those bright green…green beans! To start, you cook the green beans just enough to soften them a bit and bring out that color! They’ll cook more in the oven later, so the timing for this step is completely based on your crunch preference. Cook them in boiling water for about 5 minutes at this point if you like your beans a little less done and longer if you want them very soft at the end. I went with 5 minutes for us and Allen actually loved the way the beans were cooked in this casserole as did I! I’m a sucker for a little crunchy texture though! Best tip…use fresh green beans! Before cooking, trim and wash them in the sink. I even have the best home canned green beans from Grandma’s in our pantry, but still chose to go with fresh in this case. Once they’re cooked to your liking here, toss the green beans in a cold ice bath while you prep the rest of the casserole.

00100lrPORTRAIT_00100_BURST20191215100452005_COVER

The crispy onion topping is super easy to mix up! You’ll sauté the onions in olive oil for a quick two or three minutes to get them partially cooked but not enough that they lose their shape. Then you’ll move the onions to a small bowl and sauté the panko with butter in the same pan until that browns just slightly. Add that to the bowl of onions, mix in the parmesan cheese, salt and pepper and stir to combine!

00100lrPORTRAIT_00100_BURST20191215102301904_COVER

The last step before assembling the casserole is making the mushroom Alfredo sauce. Mmm! You’ll sauté those yummy mushrooms in butter, add garlic, stir in flour (I typed flower the first time haha), add vegetable stock and stir to dissolve flour, not flower, evenly and then finish with milk and parmesan cheese. Once everything is well combined, cheese is melted throughout and the sauce begins to thicken you’ll remove it from the heat and season with salt and pepper to your liking!

00100lrPORTRAIT_00100_BURST20191215102929909_COVER

At this point, you’ll drain the green beans from the ice bath and add them to the Alfredo sauce to stir and coat evenly and pour into a baking dish. Then sprinkle the crispy onion layer on top and bake in a 375 degree oven for 25 to 30 minutes!

00100lrPORTRAIT_00100_BURST20191215103120377_COVER

Leftovers can be kept in the fridge for a good three to four days. We had this casserole with multiple meals and it heated up well each day! If you don’t care for red onions, you could likely swap yellow onions or even omit them all together and just have the crispy panko topping on its own! And there we have it, the last post of 2019! It’s truly been a great year with lots of fun and new experiences! I hope y’all have a fun and safe new years eve tonight with plenty to look forward to in 2020. Happy New Year!!!

IMG_8863

Healthier Green Bean Casserole

A healthy twist on the classic green bean casserole we all love

Prep Time 20 minutes
Cook Time 50 minutes

Ingredients

  • 2 pounds fresh green beans washed and trimmed
  • 2 Tbsp olive oil divided
  • 1 medium red onion thinly sliced
  • 1/2 cup panko breadcrumbs
  • 3/4 cup parmesan cheese divided
  • 1/2 tsp black pepper divided
  • 3/4 tsp salt divided
  • 2 Tbsp butter
  • 8 ounces baby bella mushrooms
  • 4 cloves garlic
  • 3 Tbsp flour
  • 1/2 cup vegetable stock
  • 1 cup whole milk

Instructions

  1. Preheat oven to 375 degrees. Clean and trim fresh green beans. Heat a large stockpot of water over high heat to bring to a boil and add green beans. Cook for 5-8 minutes depending on how done you like your green beans. Use a slotted spoon to then transfer the beans to a bowl of ice water. Stir and set aside. (this stops them from cooking longer)

  2. Add one tablespoon of olive oil to a sauté pan over medium heat. Stir occasionally and only cook for 2-3 minutes so they keep their shape. Transfer the onions to a small mixing bowl. In the same sauté pan, add another tablespoon (or just under) of olive oil along with the panko breadcrumbs and stir to combine. Cook for 2-3 minutes again until the breadcrumbs are slightly browned. Transfer to the bowl of cooked onions and add in 1/4 cup parmesan cheese and 1/4 teaspoon each salt and pepper. Stir to combine and set aside.

  3. In a clean sauté pan, melt 2 tablespoons of butter and add the mushrooms . Cook for about 5 minutes and then stir in the garlic and cook for another 1 to 2 minutes until fragrant. Add in flour followed by the vegetable stock and stir until flour is evenly dissolved. Once dissolved, add the milk and 1/2 cup parmesan cheese and stir well to combine all ingredients and melt cheese evenly. Once it begins to thicken, remove from heat and add in 1/2 tsp salt and 1/4 tsp pepper and stir that together.

  4. Drain the green beans from their ice bath and add them to the mushroom Alfredo sauce. Stir to evenly coat the beans in the sauce. Pour into a 9x13 baking dish and spread in an even layer. Sprinkle the crispy onion layer on top and bake for 25 to 30 minutes allow the beans to cook more and the top layer to brown.

  5. Serve warm and store cooled leftovers in an airtight container in the refrigerator for three to four days.

Recipe Notes

Recipe ever so slightly modified from the 'Gimme Some Oven' blog! Definitely suggest you check out her blog; she has so many tasty recipes!!

Have a beautiful day!


Gingersnap Cookies

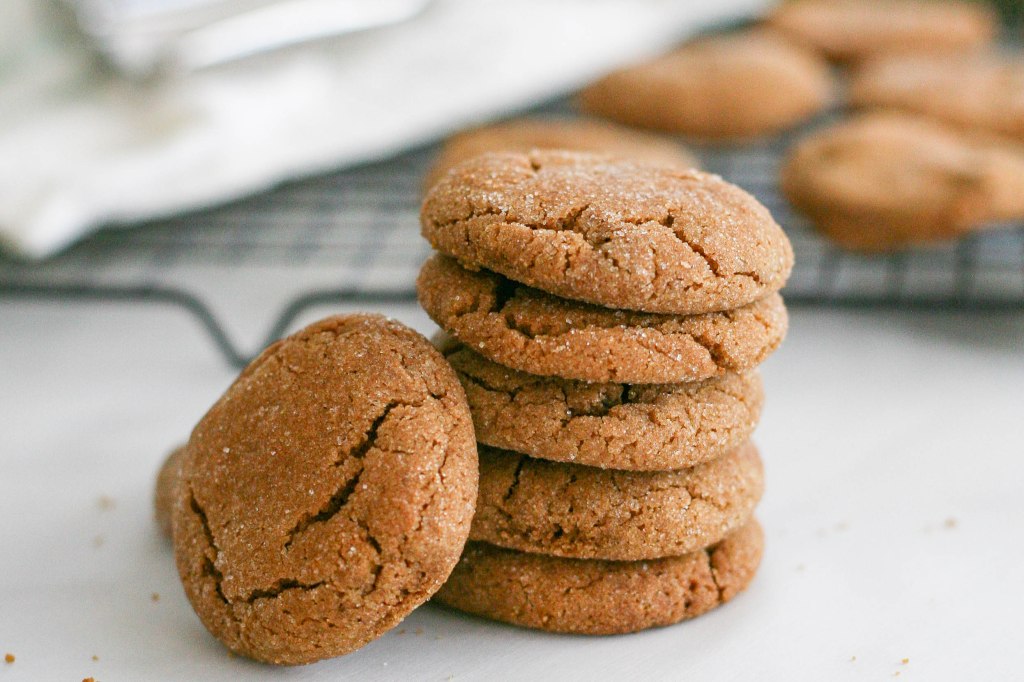
What’s your favorite Christmas cookie? Do you have one? Or even better than that, what’s your favorite Christmas memory or tradition? My favorite tradition is our family’s annual cookie baking day that’s always the week after Thanksgiving at my Grandma’s house. It’s also where I have a lot of really fond Christmas memories. We started this tradition 15+ years ago and in the beginning it was just the two of us baking more cookies than anyone would know what to do with in a day. Luckily, Grandpa was there to supervise and also take us out to dinner in the afternoon when there literally wasn’t a place to set a plate of food because the counters and table were filled with cookies! We’ve cut back a little since then and recruited some help…we’ve gotten wiser over the years 😉 I also took over making the gingerbread cut-outs and now bake those a couple days after Thanksgiving to bring along the following weekend. These gingersnaps have always been part of actual cookie day though and still are now. We mix up the dough the day before and keep it chilled in the fridge for the next day (only do this with cookie dough that does not have butter; if it has butter it will be hard as a rock the next day!) so then you just have to roll the dough into balls and coat with sugar before baking.


I love this handwritten recipe for the gingersnaps too. I don’t really have anything I collect…like the glass turtles my sister in law looks for on trips, the teapots my mother in law had lined up in her pantry or the snowglobes Hailey loves to have from each new state visited…but I do like to collect items passed down from family members and old recipes are some of my favorite things. I’m trying to decide how to preserve this one that’s even smaller than a 4×6 photo so finding a frame is slightly challenging. Of course it’d be unfair to say I’ve spent much time searching 😉 We’ll say that’s because I’ve been too busy baking cookies. Sounds good, right?

img_6815


If you don’t have one already, I’m going to continue to encourage you to invest in a KitchenAid stand mixer! It makes mixing up cookie dough such a breeze and if you have that and a cookie scoop like that blurry one pictured above you’re going to be all set for making gingersnaps with minimal effort! You simply cream all of the wet ingredients together in the mixer, stir the dry ingredients in a separate bowl and then gradually add the dry ingredients to the mixer as well until everything is well combined and ready to chill! Then you use your handy cookie scoop to roll the perfect size ball of dough, toss it around in some extra sugar and bake for ten minutes! Easy. Peasy. The recipe also makes quite a few gingersnaps so if you’re attending any cookie exchanges this season it’s perfect for that!

IMG_7210-2


A few things to keep in mind before you start gathering your ingredients in the kitchen…

• If you’re making a couple batches and have chilled the dough before baking, be sure to keep the dough for the second batch in the fridge while you’re rolling out and baking the first batch. If the dough sits out and warms up, the cookies don’t seem to rise as well.

• For consistency, use a small cookie scoop to form your dough balls. It makes them the perfect size!

• Watch the cookies closely in the oven! They’ll bake for 10 minutes, but it’s always a good idea to start checking them a minute early to avoid over baking!

• Gingersnap cookies freeze exceptionally well! We store them in Ziploc bags in the freezer. Just be sure to squeeze the air out of the bags and close completely with the press & seal or zipper.

Nine days until Christmas! Well, if you’re reading this today anyway! Time isn’t slowing down so might I suggest you look for things that can be removed from the to do list over the next week so you can replace those lines with ‘enjoy the season’? I think as adults we tend to forget to still have fun this time of year, because we’re spending all of our time “getting ready for the holiday”. Watch the movies, drink the hot cocoa, take a stroll in the snow, dine at festive restaurants, see a show at the theater and be merry! And on that note, happy baking 🙂

IMG_7158


Gingersnap Cookies

The perfect sugar coated cookies for your holiday!

Prep Time 20 minutes
Cook Time 1 hour 30 minutes

Ingredients

  • 3/4 cup crisco shortening
  • 1 cup light brown sugar
  • 1/4 cup molasses
  • 1 egg
  • 2 1/4 cups flour
  • 2 tsp baking soda
  • 1 tsp ginger
  • 1 tsp cinnamon
  • sugar for coating

Instructions

  1. Combine the shortening, brown sugar, molasses and egg in a stand mixer and cream together to mix well.

  2. In a separate bowl, stir together flour, baking soda, ginger and cinnamon. Gradually add this mixture to the wet ingredients in the stand mixer until all ingredients are well combined and dough has formed. Wrap cookie dough in wax paper and chill in the fridge for at least one hour.

  3. Using a cookie scoop, form dough into small balls and roll in sugar to coat. Add to a baking sheet (a dozen or so at a time) and bake in a preheated oven (at 350 F) for 8-9 minutes. Watch closely and remove from oven when cookies begin to crack and look almost done.

  4. Transfer cookies to a cooling rack. Once completely cooled, store in an airtight container at room temperature for 3-5 days or in the freezer for up to 3 months.


Have a beautiful day!!


Pumpkin Drop Cookies with Maple Buttercream Icing

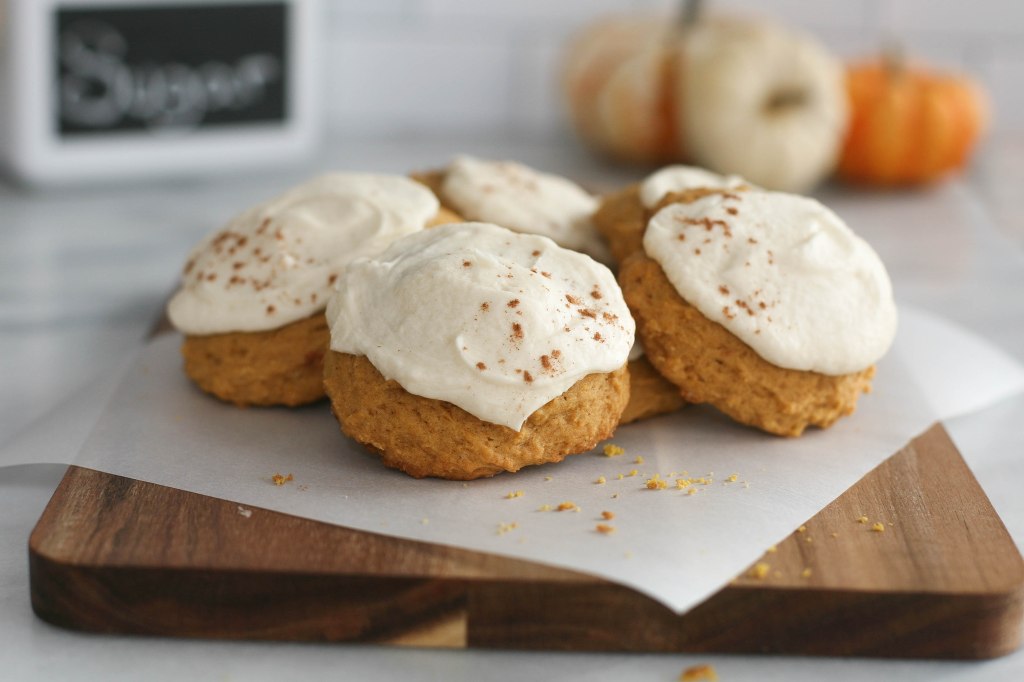
Pumpkin drop cookies round two…

See, the first time I baked these delicious cookies I nearly made mini pies instead by tossing in the entire can of pumpkin puree. Have you ever come across a cookie recipe that calls for an entire can of pumpkin? Me either. Sometimes I do things without really thinking them through. Guilty! The good thing in this case is the “cookies” were still delicious. They simply didn’t have that perfect drop cookie texture and truly tasted like mini pumpkin pies. Not a loss at all, but I had to bake them again this past weekend out of respect to the drop cookie and the extra time was completely worth it.

IMG_8682

Why hello perfectly crumbly and unbelievably soft pumpkin treat. These are total melt in your mouth cookies. I had similar ones at a friend’s traveling boutique party a few weeks ago and kind of knew at that point I needed to bake some for us once we got further into fall. I had to act fast too, because we had about two nice weeks of fall and now it’s apparently winter. It’s a brisk 32 degrees outside right now with snow falling from the sky, potentially 1-3 inches overnight! If only snow days were still a thing… 🙂

IMG_8689

Back to that traveling boutique real quick…I won’t leave you hanging, or maybe you’re already familiar with these! It was the first event I attended at a friend of a friend’s home and what a clever idea! This particular shop is called Middle Sister Boutique and the owner has a large RV type vehicle that she’s transformed into a clothing and accessory boutique inside. So you have friends/family over to your home, serve some drinks and appetizers and they can shop in the pop up boutique right in your driveway! Pretty fun!

And parties are always a good place to find new favorite recipes 😉

These cookies only require one bowl to mix up, but the order in which the ingredients are mixed is important! I highly recommend always following that instruction in a recipe, because there really is a reason behind the order. For pumpkin drop cookies, you start by combining the softened butter, brown sugar and cane sugar using a hand mixer. Then you add

  • the egg

and mix again until that’s well combined. followed by the…

  • pumpkin puree

mixing until well combined again, of course. and then the…

  • allspice
  • cloves (unless you’re like my Mom & despise cloves. then you may leave them out!)
  • nutmeg
  • cinnamon
  • vanilla extract
  • baking powder
  • baking soda
  • salt

Finally, you mix all those ingredients and then top it off with the flour. Oh…and be sure to mix well just once more 🙂 The photo below is from the time I had too much pumpkin since I forgot to retake this photo over the weekend. The dough doesn’t really look that different though!

00100lPORTRAIT_00100_BURST20191027112127583_COVER

My one and only pet peeve with drop cookies is placing them on the parchment paper to bake. It’s a tedious task for those who like cookies to be closer to the perfect side! This is a really doughy dough, to be technical, so it’s a little tricky to work with at this point. I used a small spoon for each dollop and then an icing spatula to attempt to smooth the edges. I didn’t go too crazy, because if I tried to really get them perfectly smooth I might still be in the kitchen!

00100lPORTRAIT_00100_BURST20191027114152492_COVER

These cookies will rise and spread a bit so be sure to leave enough room between each one. Bake them in a 350 degree oven for about 12 minutes and then move them to a baking rack to cool. Part two is making the icing, the simplest task if you have a stand mixer! The biggest tip here is to make sure your butter is well softened! If needed, place the stick of butter in the microwave for a few seconds to achieve this so it gets perfectly light and fluffy while mixing. Then you just add in the maple syrup and vanilla and once that’s all combined gradually finish it off with powdered sugar and a little bit of milk.

Now just get that icing spatula back out to ice each cookie and sprinkle with cinnamon – optional, but highly recommended! The best part about using buttercream icing over the typical cream cheese paired with pumpkin is these can be left in an airtight container on the counter or in the pantry for a couple days. If they last beyond that, I’d suggest storing in the fridge/freezer.

IMG_8638

Lucky for us, my Grandma still insists on hosting Thanksgiving and cooks the most delicious dinner every year! So the least we can do is arrive with dessert to add to the table. Last year it was a purple sweet potato pie with spiced whipped cream (seriously, give it a try…so good!) and this year it’s going to be a batch of these cookies! I can easily make them that morning since they’re quick to whip up and there’s little better than fresh from the oven homemade cookies.

Pumpkin Drop Cookies with Maple Buttercream Icing

Perfectly soft pumpkin cookies for all your fall get togethers

Ingredients

  • 1/2 cup butter softened
  • 1/4 cup light brown sugar
  • 1/2 cup organic cane sugar
  • 1 egg
  • 1/2 cup pumpkin puree I use Libby's
  • 1/4 tsp ground nutmeg
  • 1/4 tsp ground allspice
  • 1/4 tsp ground cloves
  • 1/2 tsp ground cinnamon
  • 1 tsp pure vanilla extract
  • 1/2 tsp baking powder
  • 1/2 tsp baking soda
  • 1/2 tsp salt
  • 1 1/2 cups unbleached flour
  • 1/2 cup softened butter
  • 2 Tbsp pure maple syrup
  • 1/2 tsp pure vanilla extract
  • 1 1/2 cups powdered sugar
  • 2 Tbsp 2% milk

Instructions

  1. First things first. Take the butter out of the fridge for the cookies and icing ahead of time so it has an opportunity to soften. Otherwise, place stick of butter in the microwave for around 20 seconds to soften.

  2. Preheat oven to 350 degrees and line two baking sheets with parchment paper.

  3. In a large mixing bowl, cream butter, brown sugar and cane sugar together using a hand mixer. Once well combined, add in the egg and mix again.

  4. Add pumpkin puree and mix until that's well combined with the above ingredients. Add in nutmeg, allspice, cloves, cinnamon, vanilla, baking powder, baking soda and salt. Mix well.

  5. Gradually add in flour and mix until all ingredients are combined.

  6. Use a small spoon to scoop dollops of cookie dough onto each baking sheet for baking. If desired, using an icing spatula to further shape and smooth the cookies.

  7. Bake one batch of cookies at a time for 12 minutes. Take the first batch of cookies out of the oven and move them to a baking rack to cool. Repeat with the second baking sheet of cookies.

  8. While the cookies cool, make the butter cream icing. Using a stand or hand mixer, cream butter until fluffy. Add maple syrup and vanilla while still mixing on low speed.

  9. Gradually add powdered sugar and mix on medium speed until well combined. While still mixing, add the milk and mix for another minute to reach a good icing consistency.

  10. Spread icing on each cookie and top with a sprinkle of cinnamon. Allow the icing to set before transferring the cookies to an airtight container to store for 2 to 4 days. Cookies may also be frozen for 3 months.

Recipe Notes

*Recipe ever so slightly modified from alattefood.com

Have a beautiful day!